I have decided to call the project "The Enclosure" (sorry, no one won the $50 prize) to reflect my focus while designing.
I will use this blog and a new website that will launch in the months to come (www.TheEnclosure.ca) to promote what I feel are good decisions that encompass the below 9 guidelines. I also hope to include hourly construction photos during the entire build, live camera feed from two angles, manufacture’s technical information on the products I choose, and most important, real life figures as to cost and performance of the built dwelling, on this new website.
I hope to work with the utilities to provide live monitoring of site used energy and will also approach groups like HPO, BCIT, and the Building Envelope Engineering sector to design laboratory experiments that will provide real feedback, from the site, on the effectiveness and durability of different wall assembly structures.
To that end, I will design a 8ft high x 8ft long ‘opening’ on the north-top-floor-exterior-wall that will allow the installation of multiple ‘plug and play’ wall assemblies with instrumentation. This will allow the recording of wood moisture, relative humidity, temperatures, and heat flux through the various assemblies over time. The results, I hope, will allow calibration of computer models and determination by building officials as to appropriate assemblies to support in code changes for decades to come.
The instrument readings, I hope, would also be made available live on my website. In this way, the dwelling could have a real contribution to the scientific community and would help my goal of creating a legacy instead of a liability.
Now, if you read some of my earlier entries, you will see that this process started for me back in 1981 when I took my first drafting course in high school. Some of the concepts represented in a design I worked on through high school are still incorporated in my modern day design. Items like a low slopped roof, vaulted ceiling above the stairs and bedrooms, 'light wells', a ‘great room’, and a shop in the basement.
Other concepts are much more recent, like optimizing the floor space to be as compact as possible, incorporating SAFERhomes standards, generally following the principles of PassiveHaus, and most importantly - putting the building enclose much higher in the priorities list (with the larger portion of the budget to match).
I believe that in order to truly build a sustainable dwelling, you must follow these basic, but powerful, principles (placed in the order I believe is the most important) when laying out your design:
1) Build what society is probably going to want in terms of functionality for the upcoming decades (no sense building a small 750 square foot bungalow with 1 bedroom, that is just big enough for you, if as soon as you no longer choose to live there, it will be torn down).
2) Build as compact a floor plan as possible - Optimize your space and make only as large as needed. This does not mean that you have to feel cramped, just decide that having that 300 ft2 'master bath’, with room for a dining table in the middle of the floor, is probably not the best use of space (ours is only 118 ft2 and includes storage).
3) Limit the volume of the envelope by limiting the number of jogs in your wall design. This will reduce your overall heat loss and material use/cost. It will also make the dwelling a lot easier and cheaper to design and build in light of the new seismic requirements in British Columbia.
4) Build out of durable products that are appropriate for their intended purpose. Do not choose a ‘green’ product that does not last or protect the structure to an adequate level just because of its perceived "greenness".
5) Within the range of products available for each build element, chose ones with as little embodied energy as possible and that use as much renewable materials as possible (my focus will be to avoid as many oil based products possible).
6) Concentrate on energy reduction over site energy creation. This automatically dictates abiding by #2 and #3 above. It also dictates concentrating on the wall, roof, and floor slab assembly’s ability to resist thermal, water, and vapour flow over HVAC ‘conditioning. And in order to achieve your enclosure performance goals, you are going to have to ensure it gets a much larger slice of the budget pie, but you will be rewarded with smaller HVAC equipment sizing needs and reduced energy bills for decades to come.
7) Build Tight and Ventilate Right! YOU should decide where the ventilation air is coming from and not just leave it to chance. This gives you the opportunity to filter the air of pollen and other contaminates, and also to pre-warm/cool the air with stale air being exhausted from the dwelling. The controlled air exchange also keeps it out of the wall and roof assemblies where it can condense and ruin your day.
8) Size any required HVAC equipment to meet your reduced thermal loss or gain needs (remember parts of the continent actually need air conditioning). Oversized HVAC equipment is prevalent in the building industry, a practice that can often result in short run cycles that limit the equipment's ability to run efficiently and rid the dwelling of harmful pollutants or humidity.
9) Do everything possible to keep your partner happy in their design wishes. Yes this is still important, just at the bottom of the list and only accommodated up to the budgets constraints. So once you have paid for good windows, lots of insulation, and durable renewable products, there may not be a lot of money left for flashy but less useful features (from a future cost savings point of view), like granite counter tops in the washrooms, $50 a square foot Italian tile, $1000 shower heads (yes they exist), $30K kitchen cabinets, and the list goes on.
I will go into some of the design decisions with a lot more detail in future posting, but wanted to give you a quick overview of the design to date and some of the outstanding decisions and design tasks.
Tasks still to complete:
• Floor Truss Design• Roof Truss Design
• Final Thermal Resistance Layer thicknesses for walls and roof assemblies.
• Window quality and U Values
• PHPP model to predict heating needs (PassiveHaus)
• Engineering of suspended garage slab
• ‘Approval’ of enclosure assemblies by my contacts in the building envelope community
• Plumbing Plan
• Electrical Plan
• HVAC equipment sizing and design (including choosing heating method – Forced Air/Hydronic/Air Source Heat Pump)
• Home Automation and low voltage design
• Site Survey
• Final Cladding design
• Final ceiling height decisions
• Layout drawings
• Permit Document Package
• Variance Application (for floor ratio*)
* My neighbourhood has its own zoning bylaw which has a requirement that upper floors can only be up to 75% of the main floor size. I am unsure of the purpose for this requirement, but it is at odds with keeping a dwelling as compact as possible (most efficient shape is a perfect square), and also runs against the new seismic requirements.
I will be asking for a relaxation of this requirement. I have made the upper floor as small as possible, but still fit in the desired 4 bedrooms and 2 bathrooms. The main floor I have also made as small as practical/desired to fit the rooms and functionality desired. This amounted to a split between the floors that is closer to an 85% ratio. I am trusting that the Municipal building department will concede to this logic and agree that this is an archaic requirement unfitting for our goal of an increasingly energy efficient building stock.
Design and Floor Plan Illustrations
 |
| Figure 1 NE Elevation |
- You will see that the north wall is almost featureless. I am fortunate to have the right sighting to make this work as I have an equally un-featured wall on the house about 15ft to the north of me. This will also support the plug and play wall ‘lab’ modules I hope to have sponsored by the building science community.
- You will also see that except for the cut-out around the garage, the dwelling is relatively square and uses roof lines to create interest instead of multiple wall jogs. This reduces the overall envelope volume which reduces cost and most importantly – heat loss.
- There is a full basement but no windows and only one north side-yard door access. The basement is dedicated to utility as you will see in the floor plans below. A future owner can create light wells and convert to a living suite if desired. This was not our focus (I have dreamed of a wood shop for decades and this was the only way I was going to get it on this property, due to zoning requirement) and a suite in the dwelling would have prevented an owner-build (dwellings with suites must use licensed contractors in my region).
 |
| Figure 2 SE Elevation |
- Generous overhangs will protect the wall penetrations from wind driven rain and on the south side will also be designed to completely shade the windows during the summer’s mid-day heat to prevent interior solar gain.
- The foundations rise 6” above grade to allow the foundation to breath and protect the wall's wood structures from moisture related damage , but I wanted flush pedestrian access at all doors with no thresholds (to meet the SAFERhomes objectives), and so have dropped the first floor to hang off the side of the foundation on ledger boards.
- Notice the shallower foundation below the garage. The garage will have a suspended engineered slab to allow for useful space below, but I only needed a 8ft ceiling in this space (rest of basement will have 9ft ceiling to allow for tall projects in the wood shop).
- I still have decisions to make on the type of cladding. I am leaning to a natural stone feature wall at front and lightly stained tongue and grooved cedar cladding for the rest of the dwelling. These wood cladded areas may be broken up by cementitious panels to provide some architecture interest (say above and below windows).
 |
| Figure 3 NW Elevation |
- Now before you all yell at me for the notch out, it is for good reason and not just ‘designed’ this way. One of the considerations when designing this house was three 125+ ft high cedars (see figure 5) on site that constrict the location and shape of the house’s outline (they have been there a lot longer than I have and have more right to the land than I). This notch is to accommodate the one cedar at the back of the house.
- The width of the house was further constrained by two more cedars to the south.
- I also wanted as shallow a house as possible to preserve as much of the backyard as possible.
- The two lookout windows on the north wall will let in some natural light and may also allow a view of the local mountains over the neighbour’s house and nearby trees.
- The square indicates the approximate location for the proposed lab ‘test panels’.
 |
| Figure 4 SW Elevation |
- The low slope roofs work well with the neighbouring dwellings with the higher roof plane on the north to match that neighbours two storey home and the lower plane on the south the allow the neighbour on that side, living in a single storey dwelling (not likely to change in the decades to come), to still have some view of the mountains.
- The higher ratio of window glazing on the south will make good use of the solar gains that can be expected in the fall through spring, and then will be blocked out by the overhangs during the summer when the sun is high in the sky (will provide shading photos in a future blog).
- There is a chance that the living room, kitchen, and master bedroom will overheat in the summer based on the west glazing present. We will design for the addition of movable exterior solar shading on the west wall in case of this eventuality (because interior shading is hardly ever effective – heat is already on the wrong side of the envelope).
- The ‘look-out’ windows on top of the roof will provide natural light year round into the north side of the upper floor and solar heat gain from fall through spring.
- Before someone yells at me for the unsafe condition shown in the above photo, I still have to design a deck that will hang off the side of the structure, and be accessed through that French door on the second floor. Fortunately, the District has already agreed that as long as this is not supported by the ground below on posts, that it will not count towards my floor space (they typically only exempt the deck area if the structure is cantilevered out from the building which of course represents huge thermal bridging).
 |
| Figure 5 Satellite photo of lot with both neighbour's lots also shown. |
- Top of photo is North.
- Two storey dwelling to north and single level dwelling to south.
- Yellow square indicates build lot and outline is rough location of planned build.
- White circles indicate location and approx. trunk size of nearby cedars.
- Notice a lack of shading for most of the south exposure. I will also have all 3 cedars de-limbed up to 30 ft and spiral pruned (you should never top a tree unless you are purposely consigning it to death). This will protect the roof surfaces from wind tossed branches and will provide full southern exposure to the lower fall and winter sun, but still provide great shading to about 30% of the summer days sun (9 AM through to about 11:45AM).
 |
| Figure 6 First Floor |
Design Considerations:
- Place as much of the ‘living’ space on the south exposure as possible to capture day-time solar gain during fall to spring months. Also allows natural lighting to dominate most daytime lighting needs. On the flip side, keep as much of the utility on the north side as possible.
- Design room layouts to provide for the natural flow of people with as little ‘intersection’ conflicts as possible.
- Meet the needs of a home based business.
- Allow 12ft ceiling height in garage to accommodate a hoist.
- Open Floor Concept (makes smaller spaces look bigger and substantially reduces materials and build time). Ensure this 'open' feeling starts at the front door.
- Isolation of bathroom from ‘Great Room’.
- Hide stair from living area and make the most convenient for the family entrance (also ensure it took the least amount of space possible so no incorporated landings and changes in direction).
- Accommodate the family entrance off the garage as the ‘Main Entrance’ with the most closet storage.
- We even have some consideration to Feng Shui best practices as to best room layout, etc.
- Door, Hall, Stairs, and all squeeze point widths to meet SAFERhomes standard.
- Accommodate newly required seismic bands (both exterior and interior). Bands dictate location of windows and doors (interior and exterior)
 |
| Figure 7 - Second Floor |
Design Considerations:
- All bedrooms on this floor.
- Ensure the number of bedrooms and bathrooms were suitable for what market in area expects. This is more than needed by my wife and I, but makes the house marketable when we no longer want to be here and reduces the likelihood that it will be torn down or significantly renovated for decades to come.
- Ensure guest bedroom is as far away from master bedroom as possible. This also holds true for the ‘TV’ room.
- Ensure sufficient closet space in all rooms (including bathrooms).
- Minimize extent of hall (another area grossly out of proportion in many 'modern' dwellings).
- Make bathrooms big enough without wasting space.
- Meet personal desire for more luxurious master bedroom located at the SW corner of the floor. Placing master bedroom in this location will allow that room to most benefit from solar gain in the shoulder months.
- Ensure walls are available for required seismic bands to line up with bands below.
- Meet my wife’s one and only requirement of a walk in closet in the master bedroom (yes I have it easy).
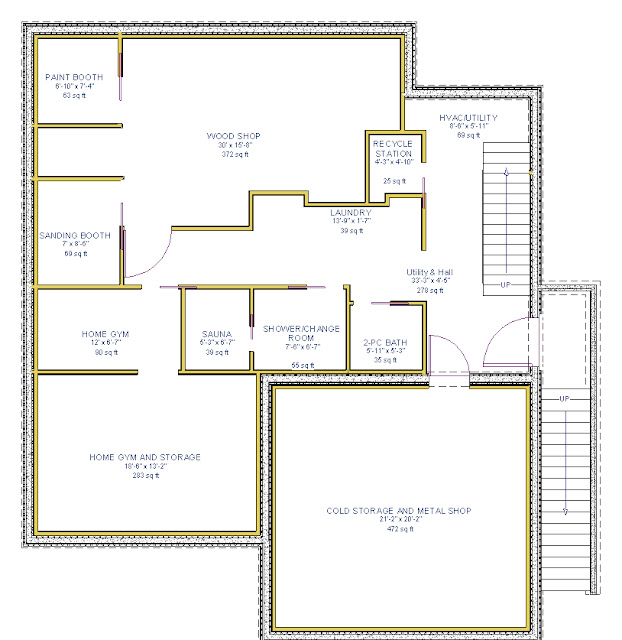 |
| Fig 8 - Basement |
Design Considerations:
- Contain all HVAC equipment.
- Provide Laundry facility where noise will not be disturbance to occupants. Also reduces flood hazard by not having it on upper floors (Holmes would be proud!).
- Provide space for home gym (first hurtle, actually using it is the hardest).
- Fulfill life long dream of a full wood shop.
- Provide Waste Vegetable Oil fuel processing station (upcoming blog entry).
- Provide for computer LAN vault.
- Provide for ample storage.
- Accommodate a Sauna.
No comments:
Post a Comment