Wow, a lot has happened since my last update.
For starters, we have moved. You can read about the first few days of the move over on my journal at theEnclosure.ca It was a tiring and stressful time that I am very happy is behind me. Of course this was followed up by a week of sickness and a computer data loss that was the worst I have had ever experienced but fortunately I have been very lucky in this regard and so this was not crippling for me (just expensive - the whole affair cost over $1000 for data retrieval and the purchase of a second battery backup so both my Raid servers are protected).
The next piece of big news is that our Development Variance permit was approved last Monday night. This was such a relieve after months of back and forth with the District. They accepted my originally proposed upper to lower floor ratio of 87% (vs. the 75% required by the bylaw), but I had to redesign the roof so that I could lower it 12" and now only be 8" above the requirement of 26'. This has resulted in the loss of my air barrier design utilizing a torch on membrane, so I will have to come up with a new game plan for creating a durable and effective air barrier at the ceiling location. Ideas anyone?
We have also been approved for our Construction Mortgage and I am thankful for the hard work put in by Tetyana Thomas at the Royal Bank. They have really stepped up compared to most banks that would not loan to an owner builder. The challenge will now be to get to the first draw. They will not advance funds until the foundation is complete. This will cost well over $100K to get to with all of the permit and engineering costs built into this phase. I am still not sure where this money will all come from and we are going to need to do some MacGyving to get through this stage. The ironic part is that they are then willing to advance 40% of the land value at the first draw which is ALL of the funds I will need to finish the project. The appraised value for the finished structure is over $2M in today's market and they felt I should be spending over $800K to build. I expect to spend less than half this due to my own sweat equity, salvaged materials, sponsorship, and a lower importance that both my wife and I share towards the 'lipstick' of a house.
Yesterday, I also received the final sealed drawings from the Structural Engineer and the GeoTech report. This is the last part of the puzzle needed to apply for the Building Permit which I will do next week. Unfortunately the first appointment available was Thursday as I will be at a THERM training course all day Monday and Tuesday.
The gas/storm/sani/water services should all be disconnected next week and I will have Hydro swing the electrical service over to the new temp pole as soon as I finish installing it and call for inspection. I hope to get this done this weekend.
But the greatest achievement was the launch of the project's website theEnclosure.ca I cannot thank Honeycomb Creative enough for their work on this site. It is first rate just like all of the other work they have done for me. I invite you to stop by and browse through the information that is available including a full copy of the plans, building assembly descriptions, and lets not forget the 'live' (actually snapshots updating every 3-5 seconds) video of the build site.
As I get caught up, I will post more information on the Varriance process for those that may need to go through a similar process.
As always, thanks for stopping by!
Friday, 28 March 2014
Thursday, 27 February 2014
Pacific Northwest National Labratory develops a new Algae fuel ready in about an hour.
Diesel created by algae has been on the radar for a few years now but is still only available in low volume pilot plants and is heavily subsidized. Once of the largest stumbling blocks has been the energy needed to create the dry algae used by the previous processes.
PNNL has created a process that can work with wet algae (80% water) saving vast amounts of energy and time. Their new process creates usable crude in as little as one hour. The process also allows for usable gas to be extracted from the waste water stream increasing the efficiency of the process even further.
This is a large step in the right direction in getting the process closer to the efficiency and scalability needed to compete with the fossil fuel market.
You can read more about this innovative process here.
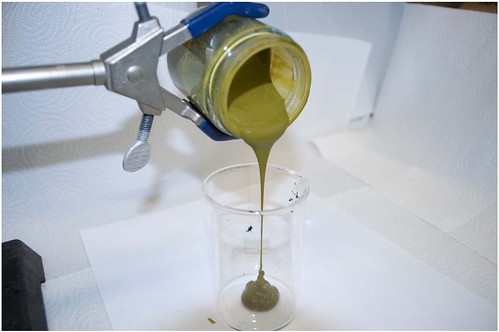 | |
| The process starts with whole green algae slurry with water contents between 80% and 90% (Photo extracted from PNNL) |
 |
| Under high pressure and temperatures that mimic the conditions found deep in the earths crust, the slime is converted into a light crude that can be refined in a traditional manner into gasoline, diesel and jet fuel. (Photo extracted from PNNL) |
Friday, 21 February 2014
Durisol ICF lowers the embodied energy of a dwelling.
Stuart Staniford at the Early Warning blogspot discusses the reduction in Embodied Energy a Durisol Foundaiton represents in a low embodied energy dwelling. In his case study, the use of a Durisol ICF foundation over a conventional concrete foundation improved the "net carbon emissions" by 100%.
His analysis showed the the original carbon emissions associated with the foundation in the dwelling he modeled dropped from aprox 7.5 tons with no opportunity for sequestered carbon to just under 7 tons but now with the ability to also sequester close to 1.75 Tons.
His analysis showed the the original carbon emissions associated with the foundation in the dwelling he modeled dropped from aprox 7.5 tons with no opportunity for sequestered carbon to just under 7 tons but now with the ability to also sequester close to 1.75 Tons.
 |
| Baseline with standard concrete foundations (http://earlywarn.blogspot.ca) |
 |
| Utilizing Durisol ICF Block (http://earlywarn.blogspot.ca) |
Sunday, 26 January 2014
Rotting OSB - Why I refuse to perform rough-in construction during the winter!
I regularly go by a construction site where a friend of my neighbor is the G.C. This house in out by the ferry terminal in West Vancouver and when done will be a very high cost home.
My latest visit reminded me of why I really do not want to expose my build to the winter rains. In fact, I will try to keep all rain of the structure until closed in by installing a 60ft x 100ft tarp over a metal cable strung between two large trees.
But back to the visit, I have been visiting this property since before the old house got taken down, and in fact this is where I salvaged very nice cabinetry to use in the walk in closet, master bath, and family entrance as well as a new wall oven and a like new drawer dishwasher. I also was able to salvage a lot of plant material from the property but so much more got left behind with the thinking it was out of the way, when in reality - they have just been trashed, such a shame.


In the end, this will probably get cleaned up as the G.C. is quite conscientious, but normally, this would just get closed in and the occupants would wonder why their floors bounce a little more than they should.
My latest visit reminded me of why I really do not want to expose my build to the winter rains. In fact, I will try to keep all rain of the structure until closed in by installing a 60ft x 100ft tarp over a metal cable strung between two large trees.
But back to the visit, I have been visiting this property since before the old house got taken down, and in fact this is where I salvaged very nice cabinetry to use in the walk in closet, master bath, and family entrance as well as a new wall oven and a like new drawer dishwasher. I also was able to salvage a lot of plant material from the property but so much more got left behind with the thinking it was out of the way, when in reality - they have just been trashed, such a shame.
 |
| Cabinet salvaged to be used in Master Bath |
 |
| Gorgeous drawers and storage for Master Walk-In-Closet |
 |
| Base cabinets to be used for family entrance |
 | |
| Wall cabinets to be used for family entrance |
But again I digress. The new house has been under construction since the middle of May 2013. The roof was installed sometime in December, but as of yesterday the majority of windows still have not been placed, and as the main floor living areas is 100% windows, the structure is very much NOT waterproof and has been subjected to many storm events leading to total saturation. And the structure is starting to show its distress accordingly. I noticed these symptoms a couple of weeks ago when there but was only able to return with a camera yesterday.
 | ||
| This dwelling is still at the rough in stage and is showing rather significant surface mould and rot fungi. These OSB webs are now |
Updated - Plumbing Design Complete - Not for the impatient!
Click here to view Completed 3D Plumbing Design - Updated
I plan on installing my own plumbing system in this house and am quite comfortable working with pipe. However it had been several years since I had reviewed the plumbing codes and my memory from those days indicates there were a lot of rules regarding the sizing and routing of pipes! So instead of talking the time to read and re-learn the code, I decided to contract out this part of the design. I contacted an instructor of a BCIT 'Build your own house' course I had taken a few years back who provided the contact info for his son, a licensed plumber.
I have been using a program called Home Designer Pro to model the house in 3D and also create the plan views. Unfortunately, this program does not include the functionality to add in plumbing. So my Google search turned up a program called Quick Plumb (http://www.quickplumb.com/). It had a 30 day free trial and a by month subscription after that. The program showed a lot of promise, so I downloaded and started to model the layout that Richard had provided. The program while easy to use on the surface, did have considerable challenges and only perseverance and patience provided a completed 3D plumbing model (I will give a full review of Quick Plumb at a later time).
Very quickly while starting the 3D modeling, I was able to see that some of what Richard had provided was not going to work, and I realized how difficult it is for plumbers to visualize a dwelling when only provided standard 2D floor plans. The architectural 2D plans often provided do not typically identify the structural details like floor beams. It is also difficult to visualize the alignment of each floor without a lot of measuring or being given some form of 3D model.
I unfortunately had not completed the structure at the time I had Richard start on the project so could not give him the structural drawings showing final beam placements. And I had no easy way to provide the Home Designer Pro 3D model to others. So we had beams in the way of branches and stacks going through cavities reserved for pocket doors and similar interferences. The pipe layout as drawn was just not going to happen.
SO I utilized the sizing and 'rules' presented in Richard's markup and set out to alter the layout to fit my structure. In the end, I had to drop three beams in the basement (my beams are generally flush so concealed within the floor cavities) and re-space some floor trusses. Fortunately, these beams could be dropped into either wall assemblies below, or into rooms that I did not mind having lower ceilings (like bathroom and sauna shower room in basement). I also had to dramatically reroute the plumbing venting as I just did not have enough space in the floor assemblies for the drains AND vents to pass over each other (my cavities are 11-7/8" deep).
Richard still has to check over the resultant design, but I believe it is quite close to what I will end up with. A 3D 'spin' of the design is available on my YouTube channel http://youtu.be/2aElBPP5Ryo.
Update: Richard went through and essentially 'approved' the plan. I have updated the 3D spin to show the model now that I have also added in the required clean-outs. The model still contains a code error (it was just too difficult to edit in the program). Can you spot it?
The design meets the following considerations:
I plan on installing my own plumbing system in this house and am quite comfortable working with pipe. However it had been several years since I had reviewed the plumbing codes and my memory from those days indicates there were a lot of rules regarding the sizing and routing of pipes! So instead of talking the time to read and re-learn the code, I decided to contract out this part of the design. I contacted an instructor of a BCIT 'Build your own house' course I had taken a few years back who provided the contact info for his son, a licensed plumber.
Richard Pugh www.rpplumbing.ca 604-351-9145 Richard.pugh@rpplumbing.ca
I sent Richard off a set of preliminary drawings and asked if he could provide a plumbing isometric. Now anyone who knows the plumbing business will understand that this is a strange request for a plumber and I was met with the expected hesitation. Most residential plumbers do not draw out the system they install, and instead just complete a very rough plan, after the framing is complete, to allow for material ordering. They then 'flesh' out the system as they are on site installing it.
If the designer (specifically those responsible for structural) has not taken into account the plumbing system, the plumber is left with some creative ways to route the pipes - especially the horizontal offsets and horizontal branch drains. And in some cases, with some plumbers that follow poorer practices, structure is modified to make room for the plumbing, compromising the stability of the structure (this seems to be rampant in the home renovation industry). In this conversation, it is important to remember that plumbers work in the world of 90º, 45º, and 22.5º fittings and all lines have to slope to drain. If you have ever laid out a plumbing system, these constraints become front and center quite quickly and dramatically effect the routing of the pipes.
After a week or so, I met with Richard and went over his drawing markups. They identified the line routings and sizes and included key information like max change in direction between a water closet and its vent (225º) as well as the max distance between a WC flange and its vent (3m). Everything looked great during our meeting review and I set off back to the office to fully flesh this plan out in my mind.
I have been using a program called Home Designer Pro to model the house in 3D and also create the plan views. Unfortunately, this program does not include the functionality to add in plumbing. So my Google search turned up a program called Quick Plumb (http://www.quickplumb.com/). It had a 30 day free trial and a by month subscription after that. The program showed a lot of promise, so I downloaded and started to model the layout that Richard had provided. The program while easy to use on the surface, did have considerable challenges and only perseverance and patience provided a completed 3D plumbing model (I will give a full review of Quick Plumb at a later time).
Very quickly while starting the 3D modeling, I was able to see that some of what Richard had provided was not going to work, and I realized how difficult it is for plumbers to visualize a dwelling when only provided standard 2D floor plans. The architectural 2D plans often provided do not typically identify the structural details like floor beams. It is also difficult to visualize the alignment of each floor without a lot of measuring or being given some form of 3D model.
I unfortunately had not completed the structure at the time I had Richard start on the project so could not give him the structural drawings showing final beam placements. And I had no easy way to provide the Home Designer Pro 3D model to others. So we had beams in the way of branches and stacks going through cavities reserved for pocket doors and similar interferences. The pipe layout as drawn was just not going to happen.
SO I utilized the sizing and 'rules' presented in Richard's markup and set out to alter the layout to fit my structure. In the end, I had to drop three beams in the basement (my beams are generally flush so concealed within the floor cavities) and re-space some floor trusses. Fortunately, these beams could be dropped into either wall assemblies below, or into rooms that I did not mind having lower ceilings (like bathroom and sauna shower room in basement). I also had to dramatically reroute the plumbing venting as I just did not have enough space in the floor assemblies for the drains AND vents to pass over each other (my cavities are 11-7/8" deep).
Richard still has to check over the resultant design, but I believe it is quite close to what I will end up with. A 3D 'spin' of the design is available on my YouTube channel http://youtu.be/2aElBPP5Ryo.
Update: Richard went through and essentially 'approved' the plan. I have updated the 3D spin to show the model now that I have also added in the required clean-outs. The model still contains a code error (it was just too difficult to edit in the program). Can you spot it?
The design meets the following considerations:
- Basement will drain to a sump and then 'pump up' to the building drain that gravity drains to the Municipal sewer (note this is not how it is drawn. The software does not have functionality that allows for a pump up)
- Upper two floors to gravity drain to Municipal sewer.
- Upper floor grey water lines will pass through a heat recovery device before exiting the building.
- Toilets will drain separately from the rest of the system to accommodate a future grey water heat recover system upgrade and possible grey water filtering system to allow it to be reused in toilets.
Friday, 24 January 2014
January Update - Slowly we are proceeding.
I am getting a few questions as to where I am at on the build and so will provide this short update.
We are getting there! OK, that may have been too short.
Currently, we are waiting to hear if our development variance will be approved. The notice went out to the neighbours between Christmas and New Years (Many Thanks to Erik at the District of North Vancouver for getting this out so quickly). The neighbours had till Wednesday to respond with only one neighbour providing official comment (positive). The next step is for staff to write the report to Council and for Council to deliberate on the application at the next available meeting. This currently is scheduled for Feb 17 (I today found out it is too tight to make the Feb 3 meeting which is disappointing but totally understandable).
Back in November when I was discussing this Variance with staff, I was under the impression that they would allow me to apply for the building permit in advance of the Variance permit approval and proceed on the condition the variance is approved. I found out this week, that I had it wrong, and that I cannot apply for the building permit until after, and if, the variance has been accepted. This news filled me with disappointment as I was budgeting 8-10 weeks for building permit approval based on previous conversations. However, the kind District Plan Checker has advised they will do their best to fast track the application and could complete the process in as little as 2-4 weeks. This would end up putting me slightly ahead of schedule.
The District staff have also confirmed I can apply for the demolition permit at any time. This will again help, as regular readers remember, I plan to dismantle the existing dwelling by hand and reuse, sell, give away, or recycle/salvage as much of the materials as possible. I estimated this process was going to take a month to complete. Current plans are to move out the first few days in March, spend a couple of weeks dealing with all of 'my stuff' in the garage and attic and storage shed, and then start tackling the dismantling of items like flooring, cabinets, end the like, all stuff not controlled by a permit. I would then schedule the services to be cut near the end of March and then start on the official 'demolition'. These efforts would all take place in advance of the building permit and further improve my schedule.
I am also nearing completion with Tacoma, the structural engineers I hired. This process has gone on longer than I believe both Tacoma and I expected, but we have made excellent progress and I believe are getting to the final drawing edits, having been through all the drawings at least once to date. There has been a struggle with my desire for a thermal bridge free envelope and Tacoma's desire to ensure the dwelling stays standing for decades to come, that has been worked out with lots of 1 and 0's flying through the internet email pathways, and I am grateful for Tacoma and specifically Heather's patience through this process. In the end, it is difficult (impossible?) to build a thermal bridge free structure utilizing 2x4 wall construction, and while complying with zoning requirements, and I have had to compromise in several areas in order to allow us to proceed with permit drawings in any reasonable time frame. There are a few areas I will try to 'upgrade' after the permit process, but will only be able to do so if ROXUL is able to provide some compressive strength testing results for their insulation in a 6" wide configuration (what I will have as continuous insulation on the exterior of the sheathing).
As you recall I recently completed a proposed plumbing waste pipe design and am now waiting for the licensed plumber to approve or adjust as required.
I also recently commissioned EcoLighten Energy Solutions to complete a room by room heat loss calculation that I will then use to design my radiant panels. I will speak to this a lot more in the future, but it is my feeling that the method I was taught as part of the TECA Residential Hydronic Designer course, is too crude for high performance homes. I plan on doing a comparison between that which EcoLighten provides and that completed using the TECA method, and will post the differences here. The preliminary model from EcoLighten shows that I will use around 50% of the energy used by a 'code built' home. With the levels of insulation and air tightness I planned, this is actually a disappointing result, as I was hoping for something closer to a 70%+ reduction. I will go over the model in the upcoming weeks and see if there are any assumptions that can be tweaked to represent what I believe will be the final reality.
I have also commissioned HoneyComb Creative to build the project website. HoneyComb created my home inspection website and were an obvious choice to approach for my build needs. The website www.theEnclosure.ca should be 'live' in approximately 4-8 weeks with at least the basic functionality, and then will be fleshed out as the project proceeds. The site will include 'live' video, time laps photographs, a link to this blog, a daily project diary, special component installation videos, dwelling design details, sponsorship links with promotional literature for sponsored products, and finally information and basic instrument readings for the science lab (once the dwelling is complete). I am looking forward to the site launch and have been very pleased with the initial artwork provided.
Well, I believe you are caught up. I will be posting documents pertaining to the variance application and the permit application, including all drawings, as I get through those hurdles.
As always, thanks for reading! Please drop me a line if you have any questions or comments.
Monday, 20 January 2014
A 9V battery can kill! Important Fire Safety Announcement
A friend recently forwarded a YouTube video series describing a
families near death experience with a fire in their home caused by the
9V battery in their smoke detector.
The husband has tried to create a positive out of this terrible tragedy by creating a video series on fire safety. There are 4 videos in the Kids and Character Series and I would like to recommend that you make it a priority to review these with your family ASAP. Taking a few moments now can save your life later.
I have personally been involved with extinguishing two substantial fires in my life and can attest to the ineffectiveness of a single fire extinguisher and the irrational thoughts that one has in the heat of the moment. In both my cases, I had multiple extinguishers being supplied (6 or more 20lb units) by others and was able to extinguish the blaze, but in both cases I was at risk due to the confined quarters of the blase, or in the first case, by the fact that if I had been unable to extinguish the blaze, my path of escape would have been blocked.
I have known about the power of a 9V for some time because it is a common camping fire starter using just the battery and some steel wool. I was horrified when I viewed these videos and decided to check out my own 'bag of batteries' and was very grateful I did. As you can see in the photos below, I have several 9V batteries embroiled with the other batteries in the bag. Fortunately none of them had yet shorted out, but as I would have added more batteries or placed something over top of the bag, who knows if the contact between the terminals of two of the 9V's could have occurred.
So please stay safe and put a little time aside to
watch the four videos and make the required changes in your life.
Especially look at the end of the second video discussing the need to
replace the emergency release chord on your garage doors with a chain.
Should you have any questions on how to do this, please do not hesitate
to contact me.
I want to thank Dave for taking such a difficult step to document his personal tragedy. You just may have saved a life or property at my house.
The husband has tried to create a positive out of this terrible tragedy by creating a video series on fire safety. There are 4 videos in the Kids and Character Series and I would like to recommend that you make it a priority to review these with your family ASAP. Taking a few moments now can save your life later.
I have personally been involved with extinguishing two substantial fires in my life and can attest to the ineffectiveness of a single fire extinguisher and the irrational thoughts that one has in the heat of the moment. In both my cases, I had multiple extinguishers being supplied (6 or more 20lb units) by others and was able to extinguish the blaze, but in both cases I was at risk due to the confined quarters of the blase, or in the first case, by the fact that if I had been unable to extinguish the blaze, my path of escape would have been blocked.
I have known about the power of a 9V for some time because it is a common camping fire starter using just the battery and some steel wool. I was horrified when I viewed these videos and decided to check out my own 'bag of batteries' and was very grateful I did. As you can see in the photos below, I have several 9V batteries embroiled with the other batteries in the bag. Fortunately none of them had yet shorted out, but as I would have added more batteries or placed something over top of the bag, who knows if the contact between the terminals of two of the 9V's could have occurred.
 | |
| A bag of batteries can kill. I looked at the bag of batteries I have in my own house only to discover 6 or more 9V batteries tossed in. |
 | ||
| If you look close, you will see a 9V battery buried in the pile in an inverted position and resting against other batteries. Good thing they had a plastic coating. But what happens when a 9V shorts out with the terminals on another 9 volt. Watch the videos to find out. |
I want to thank Dave for taking such a difficult step to document his personal tragedy. You just may have saved a life or property at my house.
Subscribe to:
Posts (Atom)